The Turing Bombe and US Navy Bombe simulator First created for the Alan Turing Year 2012: A Centenary Celebration of the Life and Work of Alan Turing.
Introduction
Besides being highly influental in the creation of the modern computer and computer science, Alan Turing was also working with code breaking in great secrecy during World War II.
Although kept secret for many years after the war, Turing worked with breaking the German infamous Enigma cipher at Bletchley Park just outside Milton Keynes, England.
Turing and a team of mathematicians and engineers constructed an electromechanical machine that exploited some specific weaknesses in the Enigma cipher. This machine was called "The Turing Bombe", and was based on an idea from Polish cryptographers.
The US Navy, with an interest to protect the convoys of the Atlantic, started development on a bombe to break the Enigma used by the German navy. The design team was lead by Joseph Desch of NCR and in 1942 Alan Turing visited Dayton, Ohio where the design of the US Navy bombes was done.
The US Navy bombes were very fast, they could complete a full four rotor run in about 20 minutes. When a stop was detected the bombe would stop and rewind to the position of the stop. Then a series of tests would be automatically performed and, if passed, relevant information printed on paper. Then the US Navy bombe would restart and continue the search. Setting up a menu on the US Navy bombe was also easier compared to the Turing bombe.
In 2018 we wrote a paper on the US Navy bombe and the simulator. This paper was presented at the first international conference on historical cryptology, HistoCrypt at Uppsala University. The paper is published by Linköping University Electronic Press.
We have tried to make the bombe simulator as historically accurate as possible. There may of course be differences that we are unaware of.
The Simulator
 Click here to access the Turing Bombe Simulator
Note: The current, HTML5 based simulator is a beta version and may have some bugs. If you want to use the previous, flash based version of the simulator, you can do so by clicking here
Try it out yourself
To get an idea of what the Turing bombe looks like in action you could download this example file: us6812_1.bmb.
Load it into the simulator and press the start button (the left of the two buttons on the front). The bombe should spring into action and finally stop with the golden indicator drums at BUO, and on the side indicate letter L.
There is an example file to use with the US Navy bombe simulator as well. Load this file (navy.bmb into the simulator and press the start button on the front of the US Navy bombe. The bombe should start and print out any possible steckers found for a stop.
Turing Bombe Tutorial

How can I use the Turing Bombe Simulator to crack an Enigma encoded message? We get this question from time to time and since the process is somewhat complicated we decided to write a tutorial on how it can be done. Right now it is available as a PDF-file. Click on the document to the left to read the tutorial.
Many thanks to Jerry McCarthy for proofreading and for suggesting improvements!
US Navy Bombe Tutorial
Jerry McCarthy has written a tutorial with clear steps and illustrations. By following this tutorial you can learn how to use the US Naby Bombe simulator to break both 3 and 4 wheel Enigma encoded messages. Click on the document to the left to read the tutorial.
Challenge

If you would like to try to break more messages Vali Popa from Romania has kindly constructed a number of challenges for this purpose. Currently there are twenty Enigma messages with cribs.
There will be more exercises published in the future with varying level of difficulty.
We will publish the name of the first three persons to solve each challenge. If you wish to participate, send an e-mail with the correct solution to us. Be careful to note which exercise you have solved (1a, 1b, etc). See "Contact us" below for the e-mail address.
Challenge Winners
| Challenge | Winner | Date | Second | Date | Third | Date |
|---|---|---|---|---|---|---|
| 1a | Greg Ames | 2019-01-12 | George Lasry | 2019-02-04 | Luigi Tomelli | 2019-02-06 |
| 1b | Greg Ames | 2019-01-12 | George Lasry | 2019-02-04 | Luigi Tomelli | 2019-02-07 |
| 1c | Greg Ames | 2019-01-13 | George Lasry | 2019-02-04 | Luigi Tomelli | 2019-02-07 |
| 1d | Greg Ames | 2019-01-15 | George Lasry | 2019-02-04 | Luigi Tomelli | 2019-02-07 |
| 1e | George Lasry | 2019-02-04 | Luigi Tomelli | 2019-02-16 | Peter Kohler | 2019-04-08 |
| 2a | Greg Ames | 2019-01-17 | George Lasry | 2019-02-05 | Luigi Tomelli | 2019-02-09 |
| 2b | George Lasry | 2019-02-03 | Luigi Tomelli | 2019-02-09 | Peter Kohler | 2019-04-25 |
| 2c | Greg Ames | 2019-01-22 | George Lasry | 2019-02-06 | Luigi Tomelli | 2019-02-14 |
| 2d | George Lasry | 2019-02-03 | Luigi Tomelli | 2019-02-14 | Peter Kohler | 2019-04-25 |
| 2e | George Lasry | 2019-02-04 | Peter Kohler | 2019-05-01 | Dan Girard | 2019-06-15 |
| 3a | George Lasry | 2019-02-02 | Luigi Tomelli | 2019-02-18 | Peter Kohler | 2019-05-04 |
| 3b | Greg Ames | 2019-01-27 | George Lasry | 2019-02-07 | Peter Kohler | 2019-05-14 |
| 3c | George Lasry | 2019-02-04 | Peter Kohler | 2019-05-05 | Dan Girard | 2019-06-15 |
| 3d | George Lasry | 2019-02-03 | Dan Girard | 2019-03-31 | Peter Kohler | 2019-05-23 |
| 3e | George Lasry | 2019-02-03 | Luigi Tomelli | 2019-02-23 | Dan Girard | 2019-04-01 |
| 4a | George Lasry | 2019-02-05 | Dan Girard | 2019-02-12 | Peter Kohler | 2019-05-14 |
| 4b | Dan Girard | 2019-02-07 | George Lasry | 2019-02-07 | Peter Kohler | 2019-05-16 |
| 4c | Dan Girard | 2019-02-09 | Peter Kohler | 2019-05-15 | George Lasry | 2021-02-01 |
| 4d | ||||||
| 4e | Dan Girard | 2019-04-01 | ||||
| 5a | ||||||
| 5b | ||||||
| 5c | Dan Girard | 2019-02-19 | ||||
| 5d | Dan Girard | 2019-06-15 |
InstructionsBrief introduction to the controls
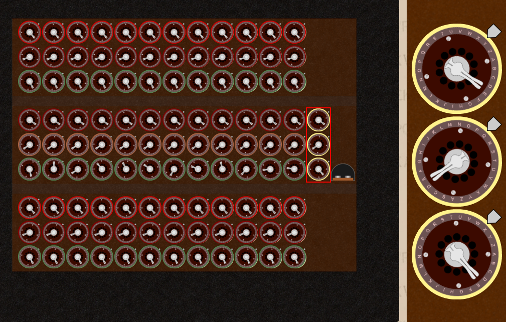
US Navy Bombe Front
Click on a rotor bank to select it. To rotate the rotor, simply click and drag with the mouse on the large version of the selected rotor bank visible to the right. To change a rotor, click on the rotor you wish to change in the large view of a selected rotor bank. Note that this changes the corresponding rotor in all rotor banks, both on the front and on the back of the bombe. Click on a bank switch to select it. A large view of the bank switch will be visible to the right. Click and drag on these larger switches to control to which letter on the diagonal board the input and output of the corresponding rotor bank will be connected. To start the bombe, click the button panel on the front and click the start button.
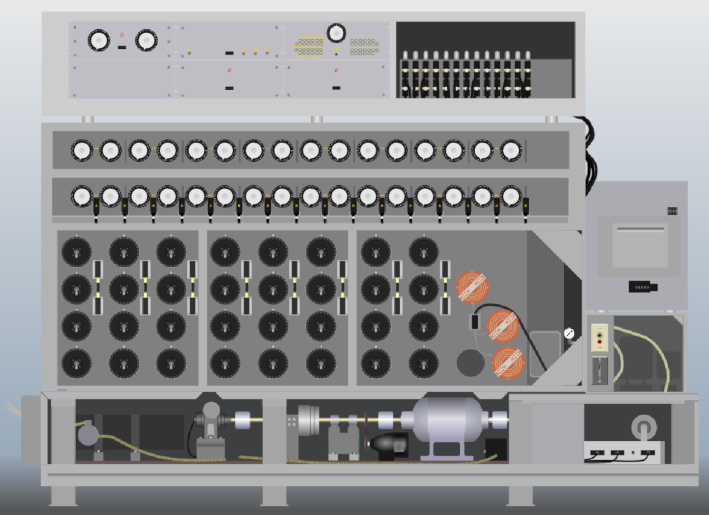
US Navy Bombe Back
The rotor banks on the back work in the same way as those on the front. To connect printer cables, first click on the diagonal board panel on the top left, this will bring up a larger view. To connect or disconnect a printer cable, click on the corresponding jack.
Turing Bombe Front
Click on a rotor bank to select it. To rotate the rotor, simply click and drag with the mouse on the large version of the selected rotor bank visible to the right. To change rotors, select a rotor bank and click on the arrow button until the desired rotor is in place. To copy a set of rotors to the whole rotor bank click the "Copy to chain" button. To copy a set of rotors to all three banks, click the "Copy to all" button
To start or stop the bombe, select the button panel on the front and click the desired button.
Turing Bombe Left Side
This view shows the three reflector boards installed for the three rotor banks of the bombe. To change a reflector board, simply click on it until the desired board is in place.
Turing Bombe Right Side
To the left is a miniature view of the side of the bombe. Click and drag the red rectangle to change which part is visible in the zoomed in version to the right. The buttons and lever on the right hand side are clickable. The lever is used to restart the bombe after a stop has been found.
Turing Bombe Back
The back of the bombe contains a number of sockets. These can be connected with cables or bridge connectors. Click on an empty socket to create a cable or a bridge connector. Drag the other end of a newly created cable to the desired destination socket.
Enigma 3 and 4
There are two versions of the German Enigma machine available: the regular three rotor version and the more exotic four rotor version.
Click and hold a key on the keyboard (either with the mouse, or on your computer keyboard) to get the encrypted letter lit up in the lamp panel above the keyboard. To change key setting, click and drag on the jagged ridge of the rotor in question. To change the ring setting, open up the top cover of the Enigma by clicking on one the knobs located on the right and left sides of the keyboard. Then, while holding the SHIFT key, rotate the rotor core relative to the ring. A handy tooltip will emerge, helping you to figure out which ring setting you have.
To change rotors or reflector, open up the top cover of the Enigma and drag the desired parts to/from the rotor storage box.
Click the Enigma button a second time or the plugs at the bottom of the Enigma to access the plug board on the front of the Enigma. Connect the cables in the plug board by dragging plugs to the desired sockets.
Checking Machine
Rotate the rotors by clicking and dragging them to the desired position. To change the ring setting, hold the SHIFT key while rotating the wheel. Click the keys on the keyboard to use the machine; the corresponding encrypted letter will light up.
To change reflector, click on the reflector cartridge on the left until the desired reflector is connected. To change wheels, click on the arrow-button until the desired wheel is in place. Note that there is a yellow dummy-wheel that should be used in the leftmost position when a three rotor code is being worked on.
Save
To save your connections on the bombe, click the Save button. All connections and settings will be saved into a file with a .bmb-extension.
Load
To load a previously saved state of the bombe, click the Load button. Select a file that was previously saved.
Contact us if you have any comments or questions
Last updated 2020-08-23